It’s never too early to get into the festive spirit! If you can’t wait for the first snowfall and Christmas jingles, here’s a fun project to tide you over until the holidays.

DIY Christmas Tree Rail
While most people are still enjoying the last of the fall, I’m looking ahead to my favorite holiday of the year. There’s so much to love about the Christmas season, from the precious family time to delicious Christmas lunches with amazing eggnog, glittering lights, and presents.
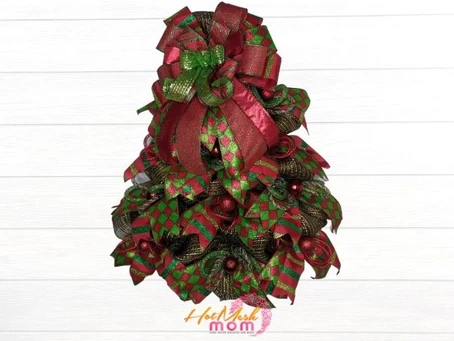
I’ve found that the best gifts come from the heart, and there’s nothing more special than a hand-crafted gift. Our DIY Christmas tree wreath rail has seasonal colors and a personal touch. The golden star finishes the tree off beautifully, giving it extra character and shine that emphasizes the love that went into creating this festive piece.
Christmas Tree Rail Supply List
- Christmas tree wreath rail
- Pipe cleaners
- 10″ metallic foil green deco mesh
- 4- 2.5″wired ribbon (red, gold, and green)
- Green tubing
- Red tubing
- 1 Red Christmas bauble
- 1 Gold Christmas bauble
- Hot glue gun
- Ribbon tail board
- Scissors
Make Your Own Christmas Tree Rail Instructions
- Prepare your wreath rail by attaching the green ties onto the rungs—it is best to use an alternating pattern. Start from the top, skip the next rung, add more ties to the third rung, and skip the next one.
- Repeat the alternating pattern until you come to the bottom rail. You should have a tie in the middle and one on each side, with a total of 13 ties.
- Start adding the green mesh from the top and work your way down, coming back around from there.
- Use the ribbon tail board to cut twelve 14″ ribbon pieces and dovetail the ends. Add the ribbon to each tie, except at the top.
- Then, cut twelve pieces of 21″ for both the green and red tubing. Add the tubing to every tie, except the top one.
- Cut the ends off the red baubles (with your hands or wire cutters) so that it is easier to glue these to the wreath.
- Hot glue the bauble and attach that point directly to the tie. Twist the bauble to strengthen the bond between the bauble and tie, and repeat this for every junction.
- Cut 8″ ribbon tails of lush gold ribbon and join these for a glitzy bow. Cut one 5″ piece with five loops and a smaller piece using 4.5″ loops to finish off the design.
- Grab the bow and attach it directly to the top tie, then dovetail it at the ends.
- Prepare your gold bauble by pulling off the attachment and applying hot glue to stick it to the bow. Remember to jiggle it to strengthen the bond.

That’s all you need for one beautiful Christmas tree wreath rail—ribbons, a rail, ties, glue, tubing, and baubles. Feel free to experiment with different ribbons to make yours unique.
A gorgeous Christmas tree wreath rail is the perfect addition for a festive, happy holiday season, whether you want to give a wreath as a present for friends or family or enjoy your own sparkly creation as a dinner table centerpiece.
If you want to make your very own wreath rail exactly like this one, then check out the recipe card below for all of the details.
If you need any help with painting your own wood signs or wreath rails and decorating your custom wreath rails, be sure to check out more of our tutorials on Hot Mesh Mom Blog.
We would love to see your amazing wreath rail designs! Please share with us over at the Hot Mesh Mom Facebook.
How To Create A Christmas Tree Wreath Rail
Christmas Tree Rail Supply List
10″ metallic foil green deco mesh
4- 2.5″wired ribbon (red, gold, and green)
Make Your Own Christmas Tree Rail Instructions
- Prepare your wreath rail by attaching the green ties onto the rungs—it is best to use an alternating pattern. Start from the top, skip the next rung, add more ties to the third rung, and skip the next one.
- Repeat the alternating pattern until you come to the bottom rail. You should have a tie in the middle and one on each side, with a total of 13 ties.
- Start adding the green mesh from the top and work your way down, coming back around from there.
- Use the ribbon tail board to cut twelve 14″ ribbon pieces and dovetail the ends. Add the ribbon to each tie, except at the top.
- Then, cut twelve pieces of 21″ for both the green and red tubing. Add the tubing to every tie, except the top one.
- Cut the ends off the red baubles (with your hands or wire cutters) so that it is easier to glue these to the wreath.
- Hot glue the bauble and attach that point directly to the tie. Twist the bauble to strengthen the bond between the bauble and tie, and repeat this for every junction.
- Cut 8″ ribbon tails of lush gold ribbon and join these for a glitzy bow. Cut one 5″ piece with five loops and a smaller piece using 4.5″ loops to finish off the design.
- Grab the bow and attach it directly to the top tie, then dovetail it at the ends.
- Prepare your gold bauble by pulling off the attachment and applying hot glue to stick it to the bow. Remember to jiggle it to strengthen the bond.
Just pin this project tutorial to save the instructions for later!