Our wreath rails can be used for so many things you guys. I am showing you how to attach a rail to a sign and how to decorate it. Learning how to do this will allow you to turn any sign into a wreath rail!
Have you ever been out and about at your favorite stores and see a sign you love but aren’t sure how to use it? I have the perfect solution for you! If you find a sign you want to use but is too big to be attached to a wreath you can easily turn it into a wreath rail instead. Today I’m showing you how to attach a rail to a sign so you can turn anything into a fabulous piece of door decor! All you need is some rapid fuse glue and a staple gun and you’ll be on your way to a fabulous new creation!

How to Attach a Rail to a Sign
There are times when I go shopping that I just want to get what I need and get the heck out. Other times I like to stroll the aisles and see all the pretty things. Whether I am in the browsing mood or not there is always a part of my brain that is on the lookout for things that would be good for my wreath creations. You guys probably do the same thing. I think it’s just part of being a maker! Sometimes I know exactly what I want to do with something and other times I just know I need it and figure out what to do with it later. If this happens to you and you have signs or attachments that you aren’t sure what to do with, this method may be just what you need!
The thing to keep in mind about attaching a sign to a wreath rail is the size of your sign. In this video I attach a 14.5” sign to a 15” rail. You’ll want to decide on the rail size based on how large your sign is and the look you are going for. We have rails in all the sizes so you are sure to find exactly the size you need! Try to picture the sign with a decorated rail below it. Do you want that rail to be longer than the sign? Do you want it to be shorter or maybe the same size? However you decide to go, you will attach the sign to the rail in the same way.
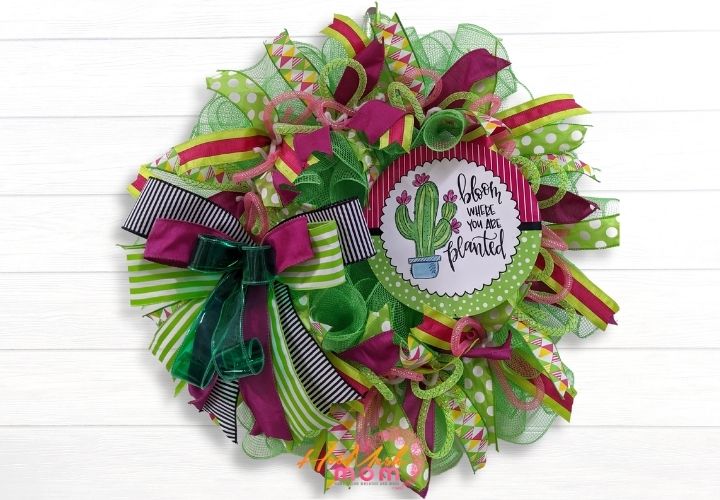
Once you have your sign attached to your rail you decorate it the same way you would a normal wreath or rail. Pull out the mesh, ribbon, and tubing that match the colors in the sign and you’ll be ready to go! In the video below I show you how I did this with a sign that I turned into a wreath rail for my mom. I absolutely love how it came out!
Supplies you need to attach a rail to a wood cutout
- Dap rapid fuse glue
- Staple gun
- Any sign
- Any size wreath rail
- Pipe cleaners
- 10” mesh
- (4) 2.5” ribbon
- Tubing
- Ribbon tail board
- Rotary cutter
- Scissors
- EZ Bow Maker
How to Attach a Rail to a Sign Instructions
- Apply a layer of Dap to the top of the rail and attach it to the bottom of the sign. Then use a staple gun to secure it in place.
- Attach 5 pipe cleaners to the bottom rung of the rail.
- Take the 10” mesh and fold over the end then attach it to one of the pipe cleaners at an end. Then make a 10” poof and attach it to the next pipe cleaner. Continue until all the pipe cleaners are filled.
- Use the ribbon tail board to measure 5- 12” ribbon tails of two type of ribbon. Cut the tails and dovetail the ends.
- Take one of each ribbon tail and place one on top of the other. Fold the tails in half and pinch the center together. Attach the center pinch to a twist tie on the wreath rail. Repeat with the remaining ribbon tails and twist ties.
- Now let’s make a bow! Use one of the 2.5” ribbons and make an 8” tail then twist the ribbon and add it to the EZ Bow Maker. Then make 2- 6” loops on each side. Now do the same thing with another 2.5” ribbon but only make 2 loops this time. Repeat with another 2.5” ribbon making 4 loops this time. For the final layer use another 2.5” ribbon and make 2 loops. Take two pipe cleaners and twist the ends together to make one long pipe cleaner. Remove your bow from the bow maker and use the long pipe cleaner to secure the center of the bow twisting it off at the back.
- Cut 4- 20” strips of tubing. Loop one strip and add the center of the loop to one of the pipe cleaner. Repeat with all the pipe cleaners except the center one.
- Now attach your bow to the center of the rail using the pipe cleaners to attach it to the rail. Then dovetail the ends of the tails on your bow.
And that’s it you guys! It is so easy to attach any size or shape sign to a rail and make something beautiful. Now when you see something at the store that you love you’ll know just what to do with it. The other cool thing about this method is that you are sure to make a unique creation that won’t be found in anyone else’s home or shop. I hope you have a lot of fun with this project, happy crafting friends!
If you need any help with painting your own wood signs or wreath rails and decorating your custom wreath rails, be sure to check out more of our tutorials on Hot Mesh Mom Blog.
We would love to see your amazing wreath rail designs! Please share with us over at the Hot Mesh Mom Facebook.
Learn How to Attach a Rail to a Sign
Supplies
Directions
- Apply a layer of Dap to the top of the rail and attach it to the bottom of the sign. Then use a staple gun to secure it in place.
- Attach 5 pipe cleaners to the bottom rung of the rail.
- Take the 10” mesh and fold over the end then attach it to one of the pipe cleaners at an end. Then make a 10” poof and attach it to the next pipe cleaner. Continue until all the pipe cleaners are filled.
- Use the ribbon tail board to measure 5- 12” ribbon tails of two type of ribbon. Cut the tails and dovetail the ends.
- Take one of each ribbon tail and place one on top of the other. Fold the tails in half and pinch the center together. Attach the center pinch to a twist tie on the wreath rail. Repeat with the remaining ribbon tails and twist ties.
- Now let’s make a bow! Use one of the 2.5” ribbons and make an 8” tail then twist the ribbon and add it to the EZ Bow Maker. Then make 2- 6” loops on each side. Now do the same thing with another 2.5” ribbon but only make 2 loops this time. Repeat with another 2.5” ribbon making 4 loops this time. For the final layer use another 2.5” ribbon and make 2 loops. Take two pipe cleaners and twist the ends together to make one long pipe cleaner. Remove your bow from the bow maker and use the long pipe cleaner to secure the center of the bow twisting it off at the back.
- Cut 4- 20” strips of tubing. Loop one strip and add the center of the loop to one of the pipe cleaner. Repeat with all the pipe cleaners except the center one.
- Now attach your bow to the center of the rail using the pipe cleaners to attach it to the rail. Then dovetail the ends of the tails on your bow.
Recipe Video
Just pin this tutorial on how to attach your rail to a sign and save the instructions for later!