

This fun floral wreath rail is just the cutest! It is so quick and easy and you will love putting it together! This welcome floral wreath rail is perfect to hang on your front door or anywhere in the house!
I am really enjoying all the fun and bright colors that go along with the spring season. This floral wreath rail design won’t take you long at all to create and hang up to give your house a beautiful and spring feel.

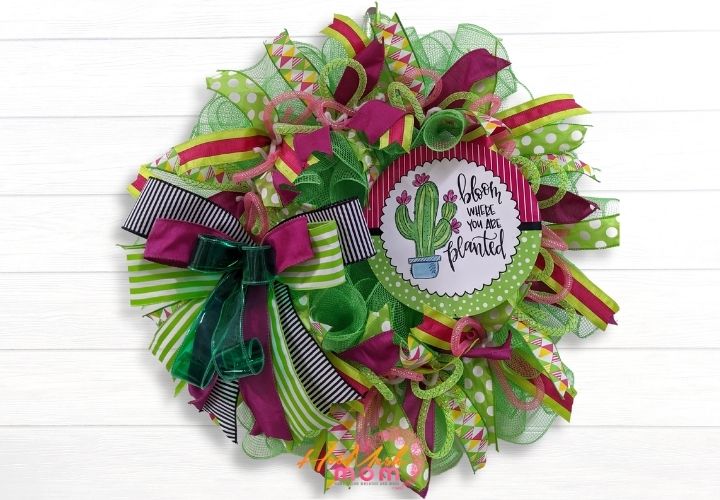
Make Your Own printed floral wreath rail
This printed floral wreath rail is so beautiful, with the details of the black and white stripes, flowers and fun colors, who isn’t going to absolutely love it? I am going to show you how I add on some mesh, ribbon, tubing, and a bow to take it to the next level.
What you will need to create this fun design:
- Printed floral welcome wreath rail
- Door hanger
- 1 x 2.5” black and white striped ribbon
- 4 x 1.5″ ribbons
- 1 x deco tubing
- 1 x pink 10” mesh
- Ribbon spool board
- Ribbon tail board
- Pipe cleaners
- Rotary cutter
Creating your floral wreath rail:
- Start with your welcome wreath rail.
- Add your pipe cleaners.
- Cut your deco mesh into pieces.
- Make ruffles with your mesh.
- Add your ruffles into each twist tie.
- Cut your ribbon tails.
- Dovetail the ends of your ribbon.
- Make and add your ribbon tails.
- Cut your deco tubing.
- Make bows with your tubing pieces.
- Add the tubing bow into a twist tie on top of the ribbon tails.
- Repeat with the rest of the tubing.
- Make your bow.
- Secure the bow together with a pipe cleaner.
- Attach your bow to your wreath rail using the pipe cleaner, in the space where there are no tails.
- Fluff out your bow.
- Dovetail your bow ends.
If you want to make your very own wreath rail exactly like this one, then check out the recipe card below for all of the details.
Frequently asked questions:
This welcome floral wreath rail was so fun to create and I’m sure you can’t wait to do it yourself! It is so beautiful and super simple to make! You are able to take this idea and make it completely different or exactly the same, but in case you have some questions, I have some answers!
How to Hang a Wreath Rail
I am sure you are wondering how you should hang your beautiful new wreath rail that you have just made?
This is one of my favorite tutorials for a simple and quick option to do to a wreath rail without a hole. There might be many ways out there to do this but I found that this is fool proof! This works for wreath rails in all shapes and sizes.
Wreath vs. Wreath Rail
The difference between a wreath and a wreath rail might not be so obvious, and you might be wondering what the difference is, it is important to know what each one does before you start making your purchase decision.
In some ways there isn’t much difference between a wreath rail and a wreath. They both look amazing with deco mesh and ribbon tails. They both can be customized for any season or style. And they both make fabulous door decor, but, there are differences between the two that make them each wonderfully unique. Check out this blog post for more information on wreaths vs. wreath rails and how they differ!
Learn How to Attach a Rail to a Sign
Our wreath rails can be used for so many things you guys, in this post I am showing you how to attach a rail to a sign and how to decorate it. Learning how to do this will allow you to turn any sign into a wreath rail!
If you need any help with painting your own wood signs or wreath rails and decorating your custom wreath rails, be sure to check out more of our tutorials on Hot Mesh Mom Blog.
We would love to see your amazing wreath rail designs! Please share with us over at the Hot Mesh Mom Facebook.

Make your printed floral wreath rail
Decorate your own welcome floral Wreath Rail with this easy to follow tutorial!
Supplies
Directions
- Start with your welcome wreath rail.
- Add a string to create a hanger.
- Take your pipe cleaners and add 5 to the wreath rail.
- Take your pink 10” deco mesh and cut 5 x 30” pieces.
- Take your mesh, fold the ends in and pinch the middle to create a ruffle.
- Add your ruffles into each twist tie.
- Take your red ribbon and striped ribbon and cut 8 x 12” strips of the striped one and 4 of the red one.
- Dovetail the ends of your ribbon.
- Layer the red ribbon in between 2 striped ribbons, pinch the middle together and add it into the twist tie with the mesh.
- Take your tubing and cut 4 x 18” pieces.
- Take the tubing, make a circle and pinch the middle to make a bow.
- Add the tubing bow into a twist tie on top of the ribbon tails.
- Repeat with the rest of the tubing.
- Make your bow: Take your 4 1.5”ribbons and make a 2 loop bow with each one.
- Secure the bow together with a pipe cleaner.
- Attach your bow to your wreath rail using the pipe cleaner, in the space where there are no tails.
- Fluff out your bow.
- Dovetail your bow ends.
Recipe Video
Just pin this printed floral wreath rail tutorial to save the instructions for later!