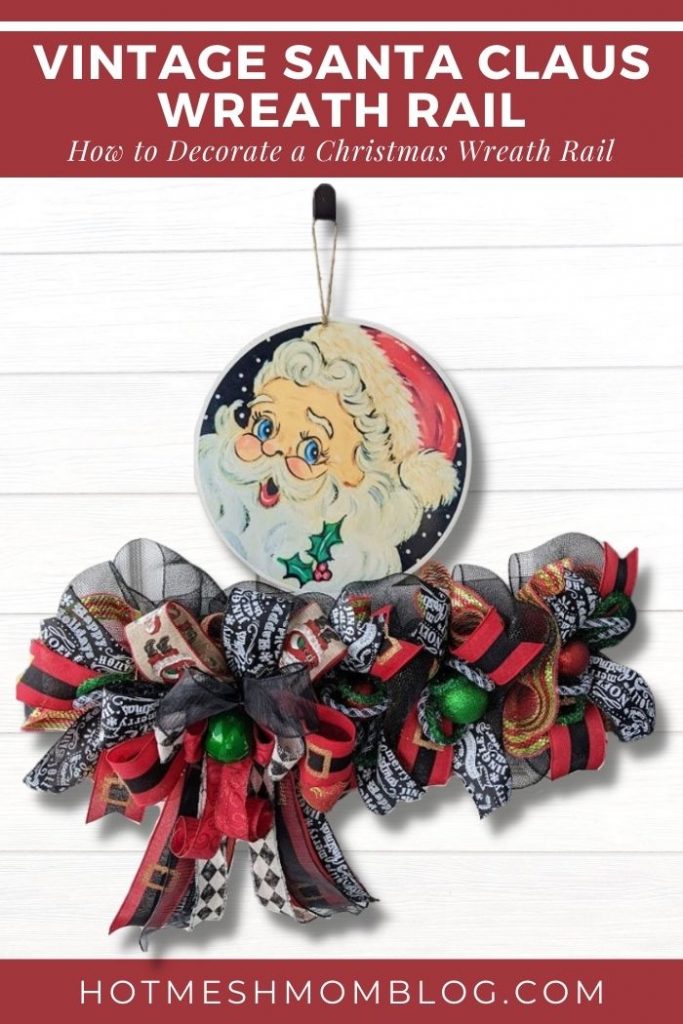
This post contains a tutorial on how to make your own DIY vintage Santa wreath rail. Follow this easy step-by-step guide and you’ll have a festive decoration for the holidays in no time!
One of the best ways to get into the holiday spirit is by adding some old-fashioned handmade charm. Check out this adorable tutorial on how you can make your own DIY Vintage Santa Wreath Rail in no time at all!
The holidays are here and we’re already thinking about Christmas wreaths! This oh so sweet Vintage Santa Wreath Rail will make a statement on your door or front wall. It’s easy to make, inexpensive and makes for an awesome gift too! Let me show you how! If you like the DIY Vintage Santa Wreath Rail, be sure to check out our other holiday decor tutorials like Toy Soldier Wreath Rail.
Decorate Your Own Vintage Santa Rail
Put this little Vintage Santa Wreath Rail on your door to spread the holiday cheer! This classic Christmas decoration will look fantastic on your front door this holiday season! It is an easy DIY project that you can do in no time. Let’s get started!
Materials for DIY Vintage Santa Wreath Rail
- 21” Deco Mesh (black)
- 10″ Deco Mesh (red)
- Spool Board (optional)
- Pipe Cleaners
- 3- Christmas 2.5” Ribbon (Santa’s Belt, Black & White Noel, Burlap Santa, and Black Sheer)
- 2- 1.5″ Ribbon (Red, Black & White Harlequin)
- Tubing (Black & White, Green)
- Bow Maker
- Scissors
- Ribbon Tail Board
- Rotary Cutter
- Red & Green Ornaments
Instructions to make this Christmas wreath rail
- Take 5 pipe cleaners and put them evenly in the middle of your wreath rail.
- Take your 21” Black Deco Mesh and start at one end of your wreath rail. Roll in the end and scrunch to the center, then add to the first pipe cleaner. Measure out 10″ and then scrunch to the center and add to the next pipe cleaner. This is a poof technique and will add fullness to your wreath rail. Without cutting, continue this technique through all of the pipe cleaners. When you reach the last pipe cleaner, cut the mesh and roll in the end, and then scrunch to the center and add it to the last pipe cleaner.
- Take your rotary cutter and cut 5- 20″ pieces of 10” Red Deco Mesh and make one ruffle for every twist tie. Roll up the edges a little bit and then scrunch it up the center. Add the center part of the ruffle to the ties.
- Cut 5- 14” ribbon tails of the Santa’s Belt ribbon. Fold the tails in half and pinch the center together. Attach the center pinch to a twist tie on the wreath frame. Repeat with the remaining ribbon tails and twist ties. Spread out your center tails in Xs and then Ks at both ends.
- Next cut 5- 14” ribbon tails of the Black and White Noel ribbon. Fold the tails in half and pinch the center together. Attach the center pinch to a twist tie on the wreath frame. Spread out your center tails in Xs and then Ks at both ends.
- Then add in your tubing. Take two different color tubing, the black and white, and the green and pinch them together like a bow and twist them in the middle of your pipe cleaners.
- With your EZ Bow Maker and your ribbons we are going to make a bow! Start with a 2.5” ribbon, measure a 10” tail, twist the ribbon and then add it to the bow-maker. Then make a 6” loop, twist, add it to the bow-maker. Make another loop on the other side then trim after a 10” tail.
- Use another 2.5” ribbon to repeat the same process making four loops this time and your loops a little smaller this time.
- Use another 2.5” ribbon to repeat the same process making four loops this time and your loops a little smaller this time.
- Then use a 1.5” ribbon to make 4 loops using the same process and then again with another 1.5” ribbon.
- For the final layer of the bow, use another 1.5” ribbon to make two smaller loops.
- Take two pipe cleaners and twist the ends together to make one long pipe cleaner. Remove your bow from the bow maker and use the long pipe cleaner to secure the center of the bow twisting it off at the back.
- Use the pipe cleaners on the bow to push through the mesh and attach the bow to the wreath rail.
- Last add in your ornaments along the wreath rail and one in the middle of the bow for a little sparkle!
I’m so excited to share this project with you because it is one of my favorite Christmas projects I’ve have done. I love all the rustic and vintage elements, but most importantly how easy it was to do! All you need are a few supplies from the craft store and an afternoon. If that sounds like something up your up for, I cannot wait to see what you come up with!
If you need any help with painting your own wood signs or wreath rails and decorating your custom wreath rails, be sure to check out more of our tutorials on Hot Mesh Mom Blog.
We would love to see your amazing wreath rail designs! Please share with us over at the Hot Mesh Mom Facebook.
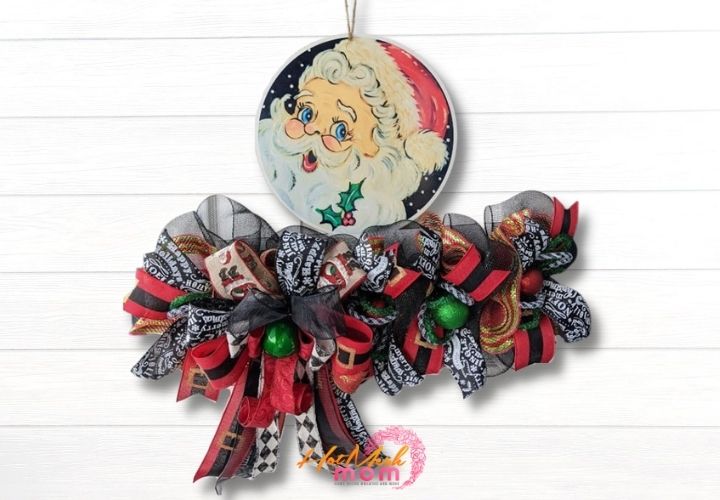
DIY Vintage Santa Wreath Rail
Learn how to decorate your own vintage Santa Wreath rail with this tutorial.
Supplies
21” Deco Mesh (black)
10″ Deco Mesh (red)
Spool Board (optional)
3- Christmas 2.5” Ribbon (Santa’s Belt, Black & White Noel, Burlap Santa, and Black Sheer)
2- 1.5″ Ribbon (Red, Black & White Harlequin)
Directions
- Take 5 pipe cleaners and put them evenly in the middle of your wreath rail.
- Take your 21” Black Deco Mesh and start at one end of your wreath rail. Roll in the end and scrunch to the center, then add to the first pipe cleaner. Measure out 10″ and then scrunch to the center and add to the next pipe cleaner. This is a poof technique and will add fullness to your wreath rail. Without cutting, continue this technique through all of the pipe cleaners. When you reach the last pipe cleaner, cut the mesh and roll in the end, and then scrunch to the center and add it to the last pipe cleaner.
- Take your rotary cutter and cut 5- 20″ pieces of 10” Red Deco Mesh and make one ruffle for every twist tie. Roll up the edges a little bit and then scrunch it up the center. Add the center part of the ruffle to the ties.
- Cut 5- 14” ribbon tails of the Santa’s Belt ribbon. Fold the tails in half and pinch the center together. Attach the center pinch to a twist tie on the wreath frame. Repeat with the remaining ribbon tails and twist ties. Spread out your center tails in Xs and then Ks at both ends.
- Next cut 5- 14” ribbon tails of the Black and White Noel ribbon. Fold the tails in half and pinch the center together. Attach the center pinch to a twist tie on the wreath frame. Spread out your center tails in Xs and then Ks at both ends.
- Then add in your tubing. Take two different color tubing, the black and white, and the green and pinch them together like a bow and twist them in the middle of your pipe cleaners.
- With your EZ Bow Maker and your ribbons we are going to make a bow! Start with a 2.5” ribbon, measure a 10” tail, twist the ribbon and then add it to the bow-maker. Then make a 6” loop, twist, add it to the bow-maker. Make another loop on the other side then trim after a 10” tail.
- Use another 2.5” ribbon to repeat the same process making four loops this time and your loops a little smaller this time.
- Use another 2.5” ribbon to repeat the same process making four loops this time and your loops a little smaller this time.
- Then use a 1.5” ribbon to make 4 loops using the same process and then again with another 1.5” ribbon.
- For the final layer of the bow use another 1.5” ribbon to make two smaller loops.
- Take two pipe cleaners and twist the ends together to make one long pipe cleaner. Remove your bow from the bow maker and use the long pipe cleaner to secure the center of the bow twisting it off at the back.
- Use the pipe cleaners on the bow to push through the mesh and attach the bow to the wreath rail.
- Last add in your ornaments along the wreath rail and one in the middle of the bow for a little sparkle!
Recipe Video
Just pin this project name tutorial to save the instructions for later!